My Trainer

LOGIQ S8 XDclear 2.0

Abdominal Imaging

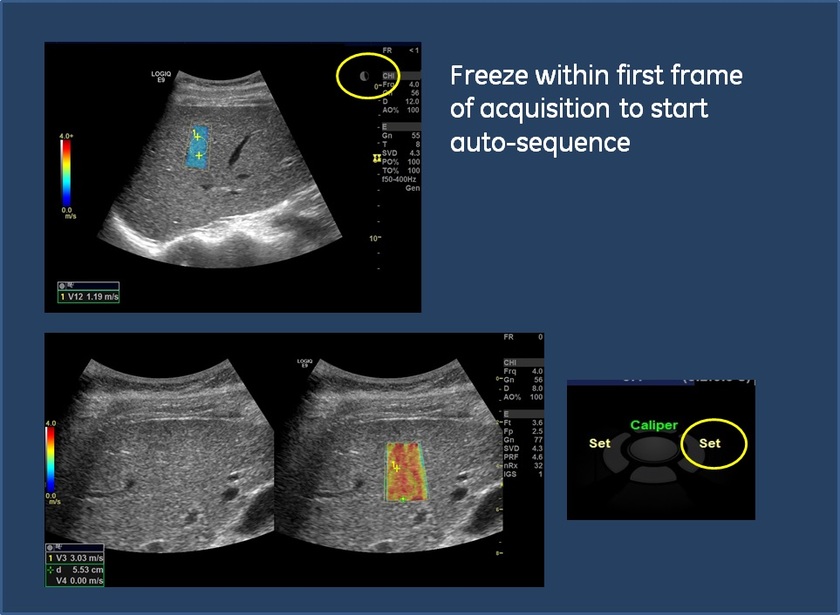
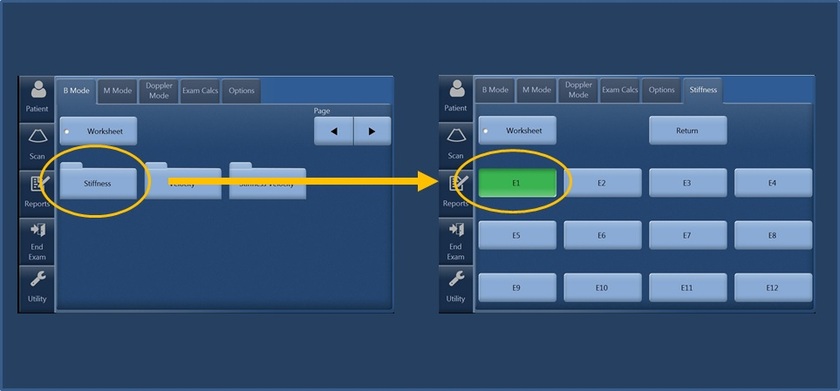
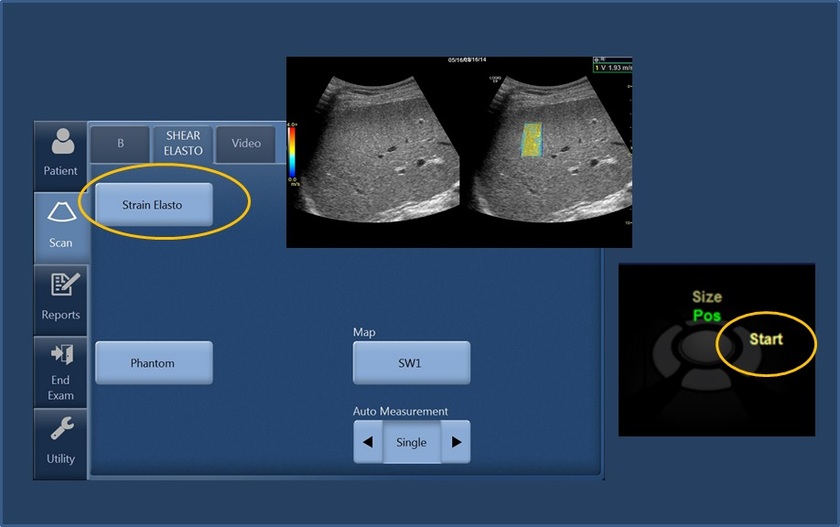
  • Activating Shear Wave (Single Image/First Frame)

    1. Select C1-6 probe

    2. Select Elasto hard key on the Keyboard

    3. Select Shear or Strain by selecting Button on Touch Panel

    4. Locate optimal window for ROI placement

    5. To Start Shear Wave, Select Start adjacent to trackball (Real Time SWE acquisition will begin)

  • 6. Select freeze within first frame of SWE acquisition. (Watch countdown clock on upper right area of monitor)

    7. Select measure on keyboard.

    8. Measurement ROI will pop-up within the color coded Shear Wave map

    9. Use Caliper and set keys adjacent to trackball to change placement of the ROI

  • 10. To Save measurement, select Set adjacent to trackball

    11. Print image.

    12. Unfreeze

    13. Select start adjacent to trackball to continue SWE acquisition.

    14. Take additional measurements as needed. (System will Auto-sequence as each measurement is taken)

  • NOTES: Machine Defaults to automatically measure once Shear Wave Image is Frozen. First measurement taken will require user to select measure. After first measurement is taken, additional measurements will pop-up automatically. Measurements will be saved to the abdominal worksheet. System will auto-sequence through 12 measurements which can be seen on TP The countdown clock alerts the user when a frame has been acquired and when the next one begins
  • Measurements(Clip store) Note: When taking clips for SWE, Print button on keyboard must be set up for clip storage or user may use the mark cine feature to store multiple frames. Contact Local Applications Specialist for further instruction.

    • Follow steps 1-5 under Activating Shear Wave.

    • Select Print button (P1, P2, etc) without freezing image.

    • Clip will store to archive.

  • • Or if Mark Cine is set up......

    • To start acquiring clip, Select Mark Cine on Bottom trackball key.

    • When desired clip is acquired, Select Print button without freezing

    • Clip will store to archive

  • • SWE will continue to be real time live

    • Take multiple clips as desired while SWE continues live acquisition

    • At any point select Freeze to stop SWE aquisition. To begin SWE again, Unfreeze and select Start

  • • Once you are finished acquiring clips, Recall Clip from Thumbnail

    • To select desired frame within Clip, Use Frame by Rotary knob to scroll through frames.

    • Once desired frame is seen, Select measurement key on keyboard.

    • Measurement ROI will pop-up.

    • Select set adjacent to trackball save measurement.

    • After measurement is set and saved, additional caliper will pop-up to take another measurement. (Multiple measurements may be taken within ROI)

    • To Select another frame within the clip, Select measure.

  • Measurements(NO AUTO-SEQUENCE/Manual measurement)

    • After selecting optimal SWE image:

    • Choose Velocity (m/s) or Stiffness(kPa) on Touch Panel

    • Select E1, E2, or V1,V2 etc. on TP.

    • Place measurement ROI within optimal area of Color coded map

    • Use Caliper and Set keys adjacent to move ROI

    • Select set adjacent to trackball to save measurement

    • All measurements will transfer to the Shear Wave worksheet

    • Once measurements are completed, Select Worksheet on Touch Panel